Part 1: The Basics
It’s the time of year when “spring cleaning” becomes the label and the means by which we encourage change in our lives. Tech skills are not immune. Are you still mistakenly writing “2016” on documents? Are you still using jQuery to write your JavaScript?
It’s time to embrace the change you’ve been resisting!
When I first learned JavaScript in 2011, jQuery was still all the rage. Hearing about all of the “bad parts” of JS scared me away from digging deeper into the language. I held onto my beloved jQuery for as long as I could, maybe longer than I should have. My comfort with jQuery and what looked like crazy new syntax in ES6 helped me justify standing pat until I finally decided to take the plunge at the beginning of this year.
Now on the other side of the learning curve, I can happily say ES6 isn’t nearly as terrifying as it seemed just a few months ago. The new features from this major upgrade steer developers away from some of the worst parts of JavaScript, make code easier to read and understand, and allow incorporation of functional programming concepts. In short, writing ES6 can make you a better developer.
What’s In a Name?
This new version of JavaScript has been called ES6, ES2015, Harmony, and Next, which signals an update to the way JS versions will be referred to moving forward. ECMA International, the group that implements the language, had been on Version 5 of their ECMAScript standard and appropriately labelled the new version ES6. This was the first major upgrade to JavaScript in over five years, so in an effort to update the standard more often and make changes easier to digest, the committee also decided to move to a yearly release cycle and name each version by the year it’s finalized.
When this major upgrade was released in 2015, it was first called ES6 and later updated to ES2015. A newer version including mostly incremental updates was finalized in 2016 that we call ES2016, and ES2017 is currently in draft and should be released later this year. The way things are shaking out for now, we tend to use “ES6” to refer to new features included in the major upgrade from 2015, and “ES2016” (or whichever year) to refer to the specific implementation. For more details, check out Ben McCormick’s post about JavaScript’s sordid naming history.
Some Good Parts of ES6
One of the great things happening with JavaScript now is the attempt to mitigate the bad parts that have scared many developers (like me) away. Some updates are just syntactic sugar on top of old features to make them more readable and ensure they are implemented properly. Other updates add new features that avoid some of the dark magic that would happen behind the scenes. And maybe most excitingly, it’s possible to write JavaScript using many of the principles of functional programming that are all the hotness these days.
There are a whole bunch of awesome new features, but it would be totally boring to just list all of them out. This post is the first in a series intended to introduce the intermediate JavaScript developer to the ES6 toolkit. The following features are considered to be some of the best ES6 features that you can use in modern browsers.
New Variable Keywords
When thinking of the worst parts of JavaScript, what’s the first thing that comes to mind? For me, and maybe many other developers, it’s variable hoisting(https://scotch.io/tutorials/understanding-hoisting-in-javascript). Have you ever spent days debugging code in which a variable isn’t outputting the expected value? Variable hoisting was probably the culprit.
To help address this, ES6 has introduced the let and const variable declaration keywords. These scope variables to the block, enclosed in curly braces ({}), in which the variable is defined. This means those variables won’t be hoisted outside that block of code, and their values will actually be as expected when reading through the code.
Using these new variable keywords inside of a block will also keep those variables from polluting the global namespace. This doesn’t just result in cleaner code, but it also prevents variables from interfering with any other blocks of code or third-party libraries that might use the same names.
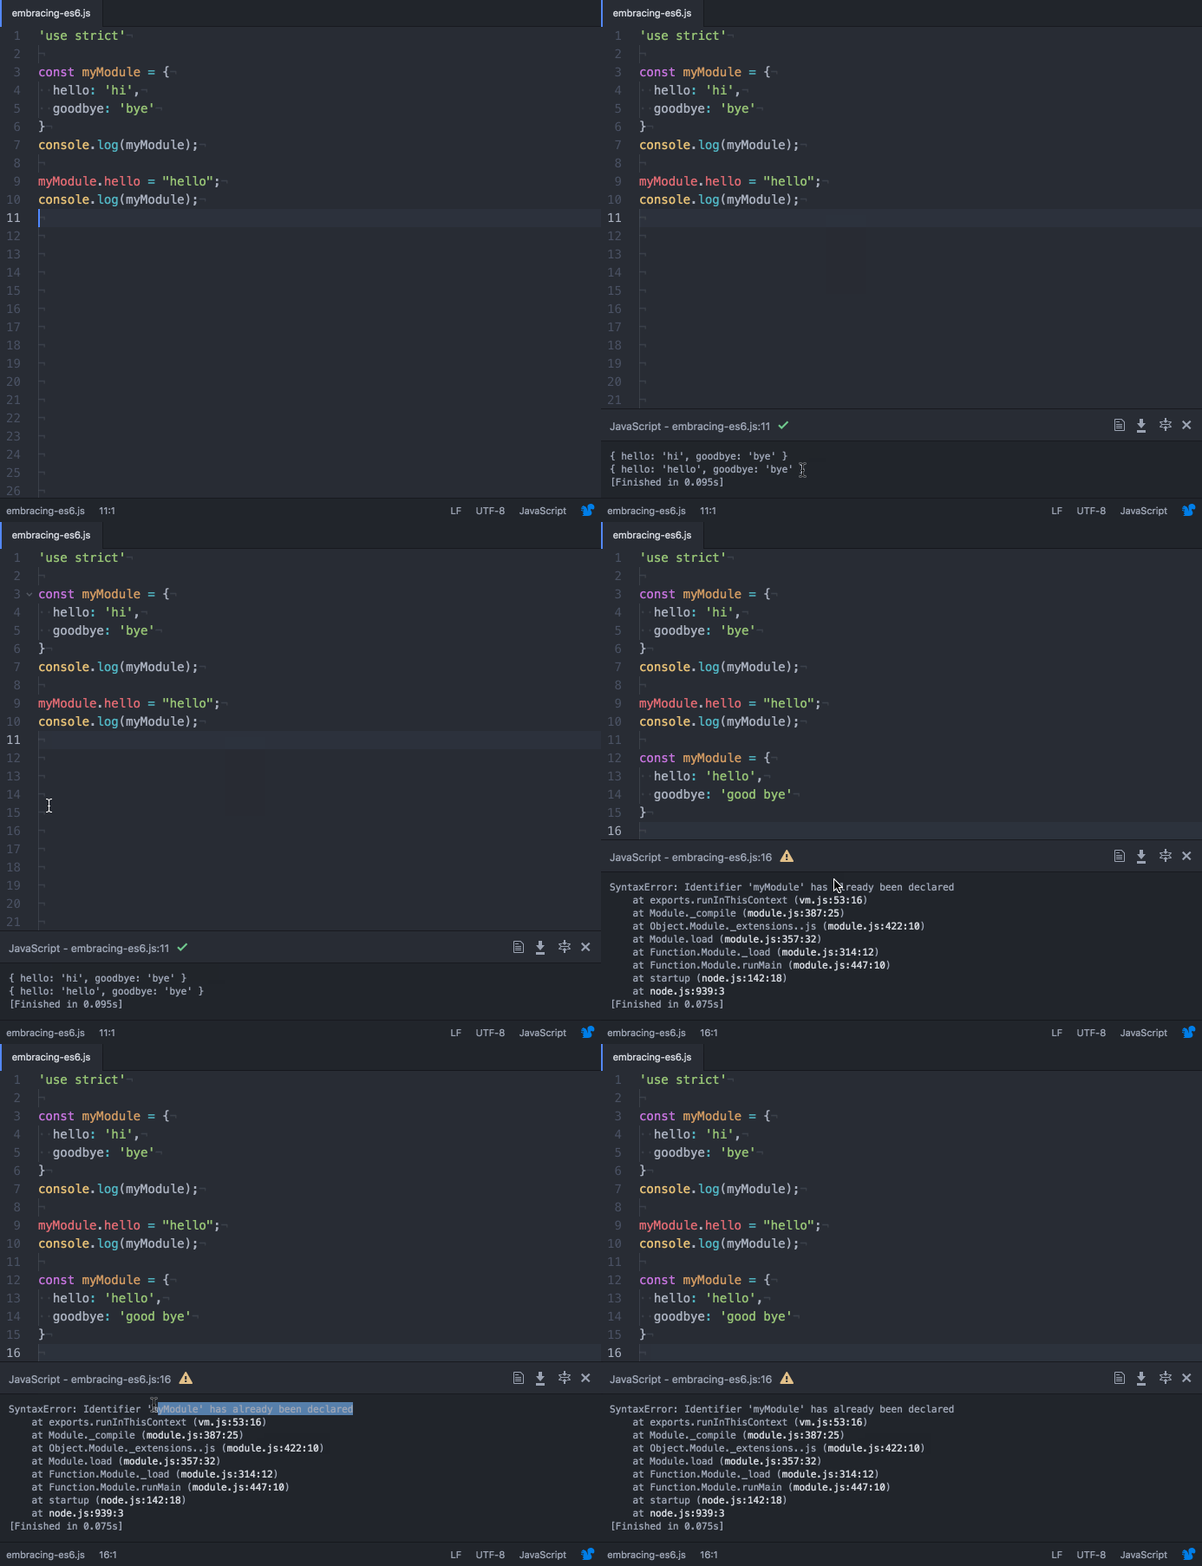
Another benefit to block-level scoping of let and const is that the JavaScript interpreter will throw an error if those variables are redeclared within the same scope. The const keyword goes even further and will throw an error if its value is reassigned. This behavior emulates how constant variables work in other programming languages. But, this is a little bit misleading in JavaScript, however, in that properties of const object can be updated, but it will throw an error the variable is reassigned to an entirely new object. See what I mean in the animation below where myModule.hello can be updated but reassigning the entire myModule variable results in an error:

In the end, using let and const instead of var prevents the craziness of variable hoisting and will throw errors on mistakes, clarifying the expected values of variables should be at any point in the code. These benefits make the var keyword unnecessary now, although it’s still supported so legacy code won’t need an update.
Arrow Functions
This is where that funky syntax comes in. The first time I saw an arrow function I immediately navigated away from the page describing it and declared ES6 to be too weird. What I didn’t realize was this syntax actually makes anonymous functions much clearer. Arrow functions clean things up by removing the “function” keyword and separating the parameters from the function body with the fat arrow (=>). That’s literally the only syntax change. Not so scary anymore, is it?
Think of a traditional anonymous JavaScript function:
myFunction = function (param) {
  // do stuff
}
The arrow function syntax isn’t all that different:
myFunction = (param) => {
  // do stuff
}
The real difference, and value, is in the scoping of arrow function variables. Arrow functions use lexical binding to scope the this variable, unlike traditional JavaScript functions. That means this used inside an arrow function refers to the this that exists outside of the function scope. For an example, say an object has a method with a callback function. Inside that callback you want to access a property. Using traditional functions and trying to access this inside the callback will look for that property within the scope of the callback and return undefined. The lexical scope of an arrow function, allows access to the module properties using this.
Here’s how this could fail in ES5, without using an arrow function:
const myModule = {
  someData: 'default value',
  parseData: function() {
    console.log(this.someData);   // prints "default value"
    this.getFromDB(function(returnedData) {
      console.log(this.someData); // prints undefined, because `this` is
      // within the scope of the callback
    });
  },
  getFromDB: function(cb) {
    // does some stuff
    cb();
  }
}
myModule.parseData();
And here’s how arrow functions can make things more better:
const myModule = {
  someData: 'default value',
  parseData: function() {         // not an arrow function, because that
    // would redefine the scope of `this` below to be the window object
    console.log(this.someData);   // prints "default value" still
    this.getFromDB((returnedData) => {
      console.log(this.someData); // prints "default value"!
    });
  },
  getFromDB: function(cb) {
    // does some stuff
    cb();
  }
}
myModule.parseData();
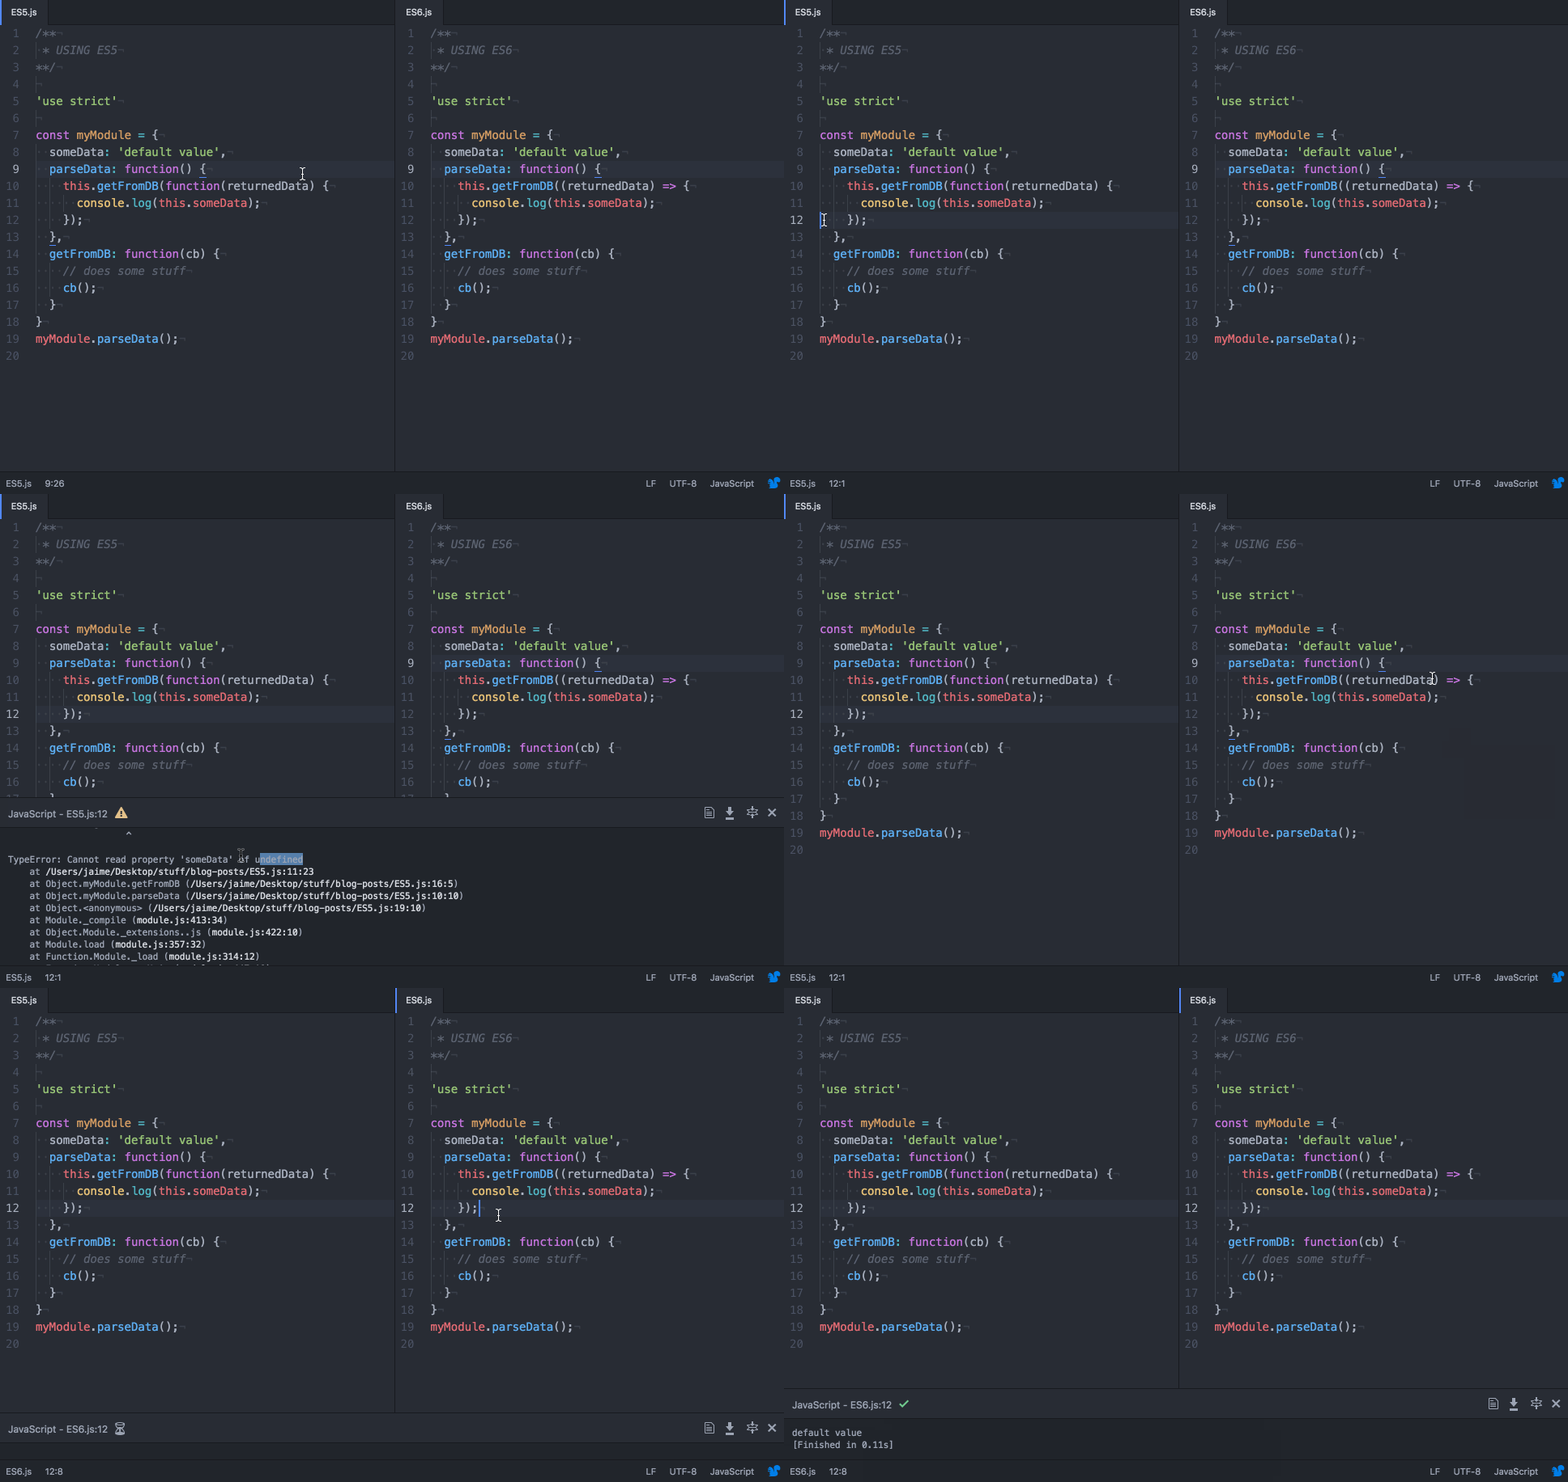
For those too lazy to run the above snippets themselves, the below animation shows how using the ES6 arrow function syntax clears the undefined error.

Another benefit to arrow functions is the clean, one-line arrow function syntax. Using this shorthand, braces aren’t required, and the return value is implicit so the return keyword isn’t needed. For example, sorting an array of numbers in ascending order could be written in ES5 like this:
var someNumbers = [8, 3, 5, 1, 2];
someNumbers.sort(function (a, b) {
  return a - b
});
With arrow functions in ES6, that function can be shortened to just one line:
someNumbers.sort((a, b) => a - b);The concise syntax of arrow functions combined with their use of lexical binding makes adhering to functional programming principles much easier. Functions can be chained together and pass their parameters to each other in a process known as currying, in a fairly elegant way using ES6 arrow functions. Eric Elliot has an excellent series of articles related to functional programming with JavaScript where you can dig deeper into these concepts.
Template Literals
Another super awesome upgrade to JavaScript with ES6 is finally the ability to write multi-line strings and use string interpolation to print the values of variables inside those strings. No, this doesn’t mean it’s now OK to write HTML in your JS. But for those times when you have no other way, at least you can properly indent code so it’s at least readable. Really, the string interpolation part of template literals is the most beneficial. The syntax is similar to Handlebars.js and uses a $ identifier (PHP, anyone?) and is clear, concise, and does more with fewer lines of code than ever before.
Standard strings wrapped in quotation marks can still be used in ES6. To use template literals, wrap a string in backticks (` `). This allows carriage returns and indentation within strings to make them more readable. To print a variable within that string, include it with the dollar-sign curly-braces identifier: ${variableName}. Logic can also be evaluated within template strings, although developers probably will want to stick to things like ${variableName.toLowerCase()} instead of anything too intense that could muddy the waters of markup vs. logic. Pretty simple, and something that can probably have an immediate benefit.
Sounds great, but how do I get started?
So even though ES6 has been finalized since 2015, not all browsers have gotten around to implementing it yet. If you write CSS, this shouldn’t surprise you. The best practice right now is to write JS using ES6 syntax and then transpile it down to ES5. The most popular transpiler out there is Babel, and you’ll most likely want to use Babel in conjunction with a task runner so that you can compile your JS every time you change a file.
For my current setup, I use Gulp and I bundle everything with Browserify, so I use the babelify package on npm for transpiling my code. I leaned heavily on the blog post Using ES6 with Gulp by Mark Goodyear to get my build system up and running. Sidenote: When using Babel with Gulp you’ll need to rename your Gulpfile to gulpfile.babel.js for it to work.
Another option could be to bundle files with Webpack instead of Browserify and ditch Gulp entirely in favor of just using npm scripts and the power of Webpack. Webpack has a lot configurations within it, and it can have a steep learning curve, making some people shy away from it. Those interested can find a good comparison of these build systems here.
I would also suggest going through a video tutorial course on ES6 to help ramp up your skills. Both CodeSchool and Wes Bos have really helpful tutorials that I highly recommend. But nothing teaches more than jumping in and writing some code. Once you have an understanding of the basics, a next step is to start a project using ESLint with all rules turned on (eslint:all) and working to clear all the errors.
Hopefully, this introduction has helped demystify ES6 and can help alleviate any fear of digging deeper into JavaScript. With this new version, things have gotten much better and the language now is on a better path, releasing updates and refining features every year. In the next series installment, we’ll dive into features like rest parameters, object destructuring, default parameters, promises, and modules. For now, you should have the tools needed to incorporate const and let, arrow functions, and template strings into code you write today.


