

Apple’s Mack truck of an IDE, Xcode, doesn’t give you a lot of room to mess with its build process, but there are a few options for customization. In this post, I’m going to illustrate an approach I’ve used to add a touch of interactivity to a project build.
Why would you need an interactive build? In my case, it warns me when I’m about to make an all-too-frequent mistake. When I’ve switched the Xcode build settings to a Release or ad-hoc build configuration to bundle an app for distribution, I’m almost incapable of remembering to set it back afterwards. After I accidentally made a release build for the tenth or eleventh time, it started feeling like Xcode should really be helping me out here. I began experimenting, and the result was this technique for making Xcode check with me before carrying out a non-Debug build.
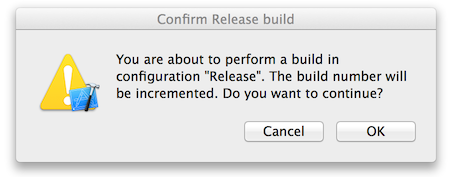
(As the prompt indicates, I’m also set up to automatically increment the build number for each non-Debug build, but that’s a separate topic.)
There are three ingredients in this recipe: Xcode build phases, AppleScript, and the osascript tool. Let’s get started.
“Run Script” Build Phases
When you hit ⌘B to build your project, Xcode begins a complicated process that begins with the set of text files, resources, and configuration files that consitute your program, and ends with the production of an executable application. The major steps it goes through are exposed to you in the form of “build phases.” You can access the build phases by selecting your application in the main navigator pane, then selecting the main app target, and then choosing “Build Phases” from the list of tabs along the top.
The invaluable thing about build phases is that you can add your own. Specifically, you can add a “Run Script” phase, which instructs Xcode to run a command-line script, such as a shell script or a Ruby script, at a given point in the build. Anything you can write in a script, you can do in one of these build phases. Xcode makes a lot of information about the build, including the currently selected configuration, available to your script in environment variables.
Here’s some more background on the build process.
AppleScript
If you’re developing apps on a Mac, you probably already know about AppleScript. It’s an ancient scripting language built into the Mac operating system, dating back to System 7, years before OS X made its debut. With it, you can write scripts to control the operating system or applications (provided they’re designed to be scriptable, which is not as common as it once was — Xcode, fortunately, is scriptable). You can augment your apps with new capabilities, or automate tasks involving multiple applications. Most important for the purposes of this article, you can interact with the user. It’s a powerful tool.
It’s also bizarre, frustrating, inconsistent, mysterious, and generally challenging. In a misguided attempt to make it friendly for non-programmers, its designers created what Matt Neuburg calls “the English-likeness monster”. Its syntax vaguely resembles ordinary English, so that you can write a command like this:
tell the application "Finder" to open the folders in the desktop where its name starts with "A"Unfortunately, that well-meaning effort backfired. By making AppleScript look superficially familiar, the designers obscured the fact that it’s still a programming language with precise syntactic requirements, and the contortions needed to implement English-like syntax (among other decisions) made those requirements weird and maddeningly opaque. It’s a hard language to learn and a harder language to use.
That said, once you know what you’re doing, more or less, vast areas of customization open up to you, and amazingly, Apple has shown no signs of discontinuing it—quite the opposite. It’s worth putting some effort into. If you want to learn it, you need a guide through the mazes and minefields: skip the official documentation and steer yourself to Neuburg’s indispensible AppleScript: the Definitive Guide.
For our present purposes, we’re using a tiny, tiny piece of AppleScript: a very short script that pops up a Cancel/OK dialog box. Nothing could be easier! A shortened version looks like this:
tell application "Xcode" to display dialog "Do you want to continue with the build?"osascript
We’ve got almost everything we need: we have a way of interrupting the Xcode build process, and a means of prompting the user. The magic glue that puts them together is a little-known command line utility, osascript. This no longer working tool runs AppleScript on demand: you pass it the AppleScript you want executed, and it runs it for you. Since it’s a command line tool, you can use it in shell scripts (or Ruby or Python scripts or whatever), and that’s where it shines—it gives you access to all the great automation features of AppleScript from anywhere you can run a normal script:
osascript -e 'tell application "Xcode" to display dialog "Do you want to continue with the build?"'Putting it Together
Here are the steps I used to make this work.
- Go to the Build Phases section of your project. (Click on the project, then on the main target, then on the “Build Phases” tab along the top.)
- Click the + at the top left to create a new build phase; choose “New Run Script Phase.” Xcode creates the script at the end of the list, naming it “Run Script.”
- Triple-click on “Run Script” to select it, and type over it with an appropriate name for the phase. I call mine “Confirm Non-Debug Builds.”
- Drag the new phase as close to the top of the list as possible. I’d prefer to put it at the very top, but Xcode reserves the topmost position for “Target Dependencies.”
- Click the triangle next to your build phase title to expand the phase. Make sure Shell is set to
/bin/shand “Run script only when installing” is not checked. - Click into the black script box and paste in the following script. Note that double-quotes and backslashes within the embedded AppleScript have to be escaped. Xcode also has an annoying habit of stripping out the indentations, but I’m including them for clarity.
# If this is a non-debug build (which will increment the build #),
# prompt the user to confirm that this is intentional
if [ $CONFIGURATION == 'Debug' ]; then exit 0; fi
BUILD_CONFIRM_SCRIPT="
   try
      tell application \"Xcode\" to display dialog ¬
         \"You are about to perform a build in configuration \\\"$CONFIGURATION\\\". The build number will be incremented. Do you want to continue?\" with title \"Confirm $CONFIGURATION build\" with icon caution
      return \"ok\"
   on error
      return \"\"
   end try
"
BUILD_CONFIRM_RESULT=`osascript -e "$BUILD_CONFIRM_SCRIPT"`
if [[ $BUILD_CONFIRM_RESULT == 'ok' ]]; then
   exit 0
else
   echo "*** User aborted build to avoid incrementing the build number"
   exit 1
fi
Three notes on the above script:
- The output of
echogoes to the build log, which can be very helpful later.- The script’s result value determines whether the build can continue or not; a non-zero result indicates a failure and stops the build.
- The messages embedded in the script refer to incrementing the build number. You’ll obviously want to modify them accordingly depending on what your own build process is doing.
You’re done! Set your Xcode project to a scheme other than the default (Debug) configuration, such as Release, and begin a build. You should be asked for your confirmation.
# Bump build number for non-debug builds; number is set up for the NEXT build
BEFORE=$(/usr/libexec/PlistBuddy -c "Print CFBundleVersion" "$INFOPLIST_FILE")
if [ "$CONFIGURATION" == "Debug" ]
then
    echo "BUILD NUMBER: leaving next build # unchanged at $BEFORE (this is a debug build)"
else
    AFTER=$(($BEFORE + 1))
    /usr/libexec/PlistBuddy -c "Set :CFBundleVersion $AFTER" "$INFOPLIST_FILE"
    echo "BUILD NUMBER: bumped build # from $BEFORE to $AFTER for next build"
fi